 Tackling Movable Type templates and CSS for the first time can be daunting. The MT default templates contain four kinds of code: CSS, HTML, MT tags, and Javascript.
If you’re new to all this, you’re about to learn that it pays to make a careful study of the code. Once you understand the way it works together, it’s pretty easy to modify your MT templates to display almost any design you want.
Understanding the Divisions
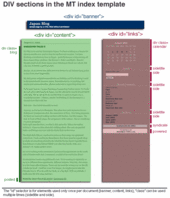
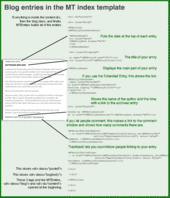
Let’s start by taking a look at what the different sections are and what the code does. I’ve broken apart the default template in an illustrated way. This isn’t exactly a Movable Type tutorial, but it does point out where the divs are and what the tags look like in code and rendered in the browser.
This diagram shows where the div sections of the MT index template begin and end. (Please click to open a larger version in a new window.)
 Positioning with CSS
Want to move these three major sections to different locations on your page? Start by modifying the style sheet entries for #banner, #content, and #links.
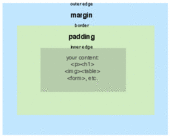
Most of the positioning elements in this stylesheet are margins and padding. Note that when a margin or padding is specified with four values, the order is always TOP, RIGHT BOTTOM, LEFT. If only one value is specified, it applies to all four sides equally.
Almost anything on your page can have margins and/or padding added to it—images, forms, tables, paragraphs. Usually margin and padding are mixed in with the formatting elements that control color, fonts and so on. In the examples, I removed the formatting controls as they rarely cause confusion once you understand positioning.
Margins and padding are nearly interchangable. The main difference is that if you’ve specified a background color in your style, padding adds an edge of the background color, but margins do not.
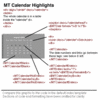
There are several other positioning elements that are crucial to the overall layout of the MT default index page.
Position:absolute This is used by the #content element and it means that #content ignores where other things are on the page and puts itself where you specify based on margins of its “parent.” In the default MT index template, the #content element is absolute in relation to the
tag. It’s 225 px from the left margin, which leaves room for the left-side links section.Position:relative This is the opposite of position:absolute. Relative positioning lets you shift an element on the page in relation to the things around it.
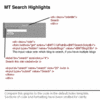
Float:left Floats are a little confusing, but if you’ve ever wrapped text around an image in Word, PageMaker, or a similar program, you’ll understand the basic concept. In CSS, anything can be floated—images, paragraphs, headings, divs. Float can create some surprising and bad layouts, partly because not all browsers (including IE6) support them well, so read up on float before you start using it. And be prepared to test in many browsers to make sure it looks OK.
Width:200 This is used in the #links style in the default template. It ensures that the links section doesn’t overflow into the #content section (which is 225 pixels from the left margin)
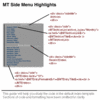
One final note. The difference between # and .
#name — ID — used only once per document
.name — CLASS — used as many times as needed in the document
This is not everything there is to know about positioning. For more details, check out Eric A. Meyer’s comprehensive (but a little daunting) CSS books. For up-to-date online help, Google for CSS positioning tutorial.
A Positioning Example
To move the “links” column to the right instead of the left (MT’s default), you need to edit #content and #links in the style sheet. In #content you change the position to relative and add a float and a width. You also change the values for the margin. In #links, you remove the width and adjust padding:
|
|
#content { #links { | #content { #links { |
 Formatting the Blog Entry
After you have the major divisions sorted, you can focus on formatting your blog entries. Changing the way the blog entry looks requires a mix of the style sheet, special MT tags and HTML.
There are three things you might want to do to format your blog entry:
- Adjust the text displayed (Format the date as 2003-08-14) - MT Tags
- Change the fonts, color, spacing, etc., of the text - CSS
- Move the text to another place in the entry - HTML template
All the sections of the entry (the date, title, body, extended entry link, posted, comments link, and trackback) follow a similar pattern: to change the text displayed take a look at the options for the MT tag and change the template; to change the way the text looks, change the CSS and to move the data around within the entry, cut and paste within the template HTML.
Let’s take one section of the entry as an example:
Entry Date
To change the text of the date, you change the <MTEntryDate format=”%x”> by substituting something else for the %x. All the date format codes are in the MT Manual.
To change the font and color of the date, you edit date in the style sheet.
date {
font-family:palatino, georgia, times new roman, serif;
font-size: large;
color: #333;
border-bottom:1px solid #999;
margin-bottom:10px;
font-weight:bold;
}
To change the location of the date within the entry, cut these lines from the HTML, and paste them where you want the date to appear. These lines must stay inside the MTEntry.
<MTDateHeader>
<h2 class=”date”>
<$MTEntryDate format=”%x”$>
</h2>
</MTDateHeader>
More Study Examples
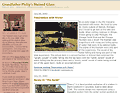
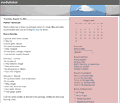
I took the screenshots from Jason Cha’s Japan Blog, Philip Hill’s Grandfather Philip, and my own Media Tinker weblog. Thanks to Bob McDonald, Rudolf Ammann, Gary Lawrence Murphy and Olivier Thereaux for their helpful suggestions.
Posted by kuri at August 08, 2003 07:08 PMVERY much so for newbies to CSS. I ended up trashing the initial versions of the templates and starting with a table based layout, but it woulda been helpful to have known what the original templates looked like…
Of course, for me, that was many months ago :|
Posted by: Randy on August 8, 2003 10:44 PMNot only I would appreciate it, my readers would be grateful for you for generations to come.
Posted by: Camilo on August 11, 2003 10:04 PMWow, thanks. I’m surprised that no one else has taken the time to simplify and explain things like this. I sure appreciate it, because I’m not really a web developer but I’d love to customize my blog(s) before I deploy it (them).
Posted by: Dirk on August 12, 2003 12:31 PMYou mean it doesn’t have to be arcane!
Posted by: jcwinnie on August 15, 2003 02:07 AMGreat job!
Posted by: Joy on August 16, 2003 06:52 AMGreat job!
Posted by: AgentVic on August 16, 2003 08:23 AMSaved me a lot of time to learn Movable Type.
I also love your work.
Thanks!
Posted by: Yi Chen on August 17, 2003 01:41 AMIt’s so refreshing to find instructions that do not assume we beginners know anything at all — because quite ofter we don’t. Other “how-to” pages are written for intermediate to advanced users. These tell you exactly what to do and exactly how to do it. Some programmer types can’t write clearly in anything other than code. Oaklid can and does. Thank you!
Posted by: Ken Buchanan on August 17, 2003 02:08 AMmany thanks for this clearly written tutorial - although i’ve been working with CSS for some time now, your work helped me to finally get my MT templates right.
Posted by: Alexandra on August 20, 2003 06:00 AMVery helpful! I’ve had to figure so much of this out by myself. MT desperately needs a manual that is laid out simply like your instructions. Thanks!!!
Posted by: elise bauer on August 26, 2003 08:49 AMThank you Kristen. After reading your tutorial, I feel like the Red Sea has parted and I can now begin to understand what lies b4 me. Six Apart and the MT crew should really incorporate your explanatin into their manuals. It would save users like myself countless hours of trying to figure the code out.
thanks for sharing this information, it was really helpful!
Posted by: stef on September 2, 2003 12:51 AMu seriously need to go rewrite the MT instructions and get paid.
Posted by: kevin on September 4, 2003 07:16 PMgreat job!
Posted by: William on September 5, 2003 10:37 AMThanks bunches. The best explation of MT templates I have found so far. Been useing MT for just a few day and trying to understand who some of it works is just plain frustrating sometimes. This helps alot.
Posted by: davidlee on September 19, 2003 02:22 PMBeauty’s! I’m portuguese and I use movable type. Good bye. Great job ;D
Posted by: catarina on September 29, 2003 02:25 AMBeauty’s! I’m portuguese and I use movable type. Good bye. Great job ;D
Posted by: catarina on September 29, 2003 02:25 AMThanks for the help! Ill be back to read more.
Any tips on how to create a 3 column layout?
Posted by: Erik on October 3, 2003 03:45 PMWOW I wish I had found this when I was setting up movable type for the first time. This is a great resource. I’ll definitely be recommending MT newbies to this site!
Posted by: katharine on October 22, 2003 08:30 PMGreat Job!!! This makes the whole process so much cleaner.
Posted by: Richard on November 4, 2003 06:44 AMSaved me a lot of time.
Posted by: marc on November 5, 2003 11:45 AMi’ve created a 3-column layout [ http://barnabe.weblog.com.pt ] but it seems to fail with some browsers (esp. IE5). what can be done?
Posted by: Rui Tavares on November 23, 2003 01:01 PMwow this is what i needed. thanks for the great advice! now i’m ready to format my blog
this description helped me a lot in my template tweaks but i need toknow more aout the positioning. I would like to know more about how to use html tables to allign entry bodies.
Posted by: turgan on December 19, 2003 08:02 AMThank you A LOT!
I wasn’t understanding that crap of code until I see these wonderful tutorial!
Thank You! :-)
” In the default MT index template, the #content element is absolute in relation to the tag. It’s 225 px from the left margin, which leaves room for the left-side links section.
“
which is 225 px right ?
awesome - i wont end up bald from pulling all my hair out.
Posted by: dude on January 16, 2004 06:36 PMWow. This would have been immeasurably helpful when I was starting out. Simply excellent. The MT folks would be wise to hire you on for documentation. Again, great job.
Posted by: Patch on January 18, 2004 01:58 AMPerfect
Posted by: someone on January 20, 2004 06:33 AMPlease Help!
I’m learning a lot from your site. Your Illustration helps a great deal. I’m still having a problem though. I had been testing and jumping from different MT styles. I like to have everything centered on a page like thisone and like yours. I want to change my templates other than the MT default styles. Does your template only have 2 columns? Right now, all I’m using are the MT default styles. Also, I like my page to stay in one place when you colapse the browser. How would I do that? Thanks.
